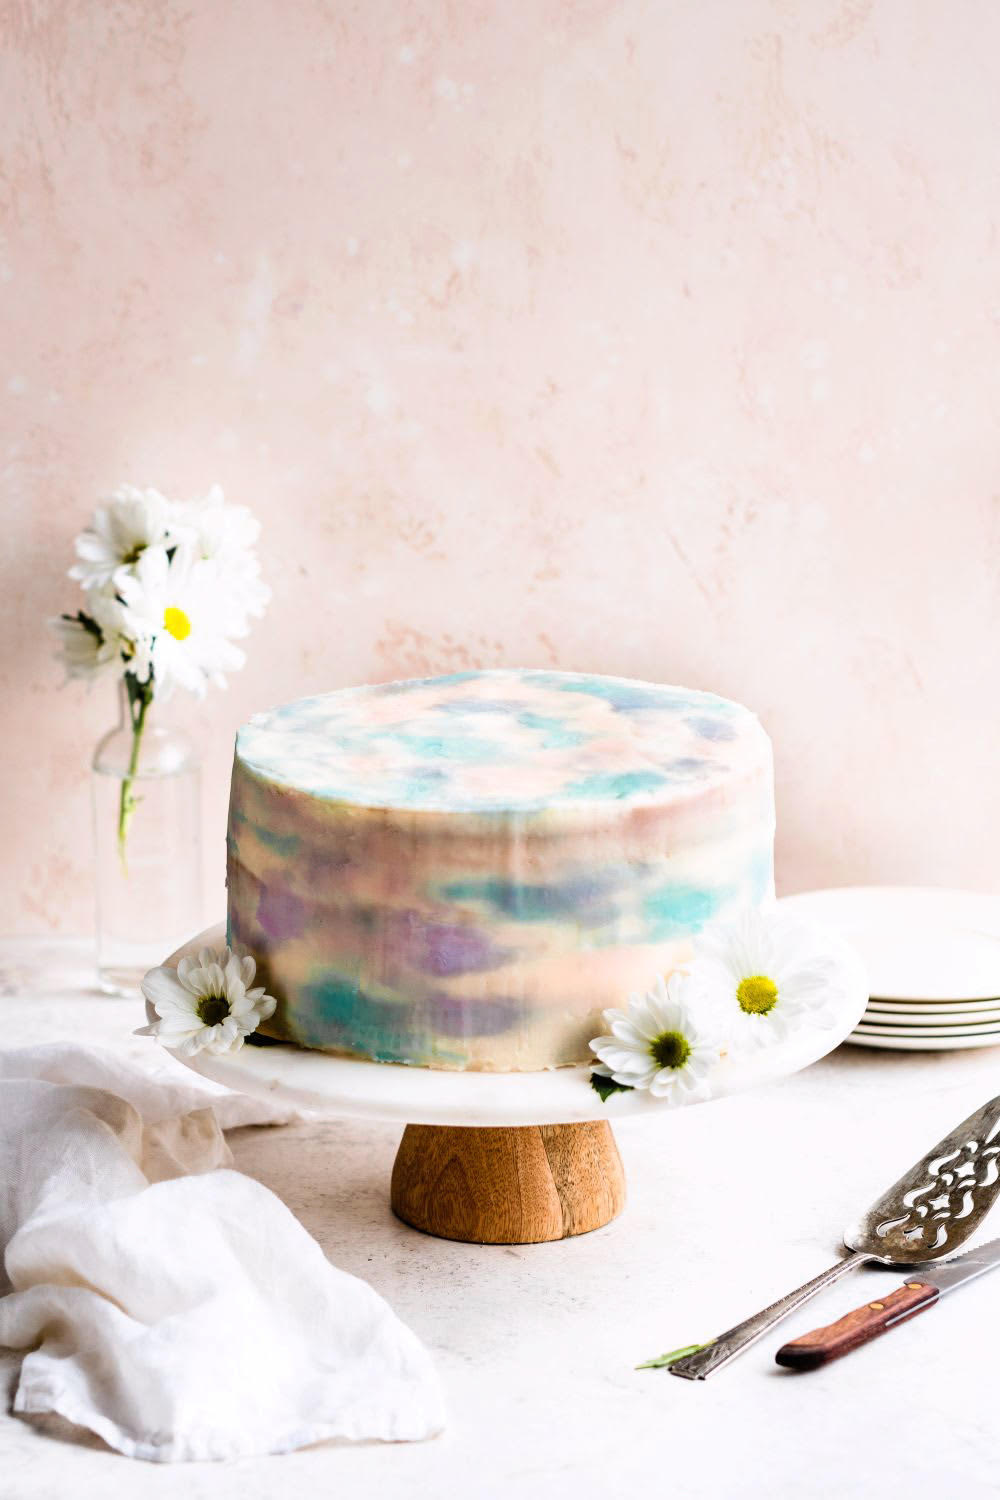
This watercolor cake is a treat for the eyes and the mouth! The beautiful colors are perfect for spring and summer, especially special occasions like Mother’s Day, birthdays, or baby or bridal showers. Plus, you can customize the colors for any occasion you like–i.e., graduation parties. I used light pastel pinks, purples, and blues to create this watercolor effect on my cake. It’s an incredibly simple technique that I know you can pull off, even if you consider yourself a cake-decorating novice like I do!
The process is as simple as frosting a cake with a base layer called the crumb coat, chilling that, and then adding food color-dyed frosting in small dollops around the rest of the cake. The secret is to use an inexpensive tool called a cake smoother or scraper to smooth out the colored dollops, creating the watercolor effect.
For this cake, use any recipe you love that makes a 3-layer white or vanilla cake. Or, use your favorite cake mix. I wanted to focus on sharing the frosting technique with you for this recipe, so I’m leaving it up to you to pick whatever is easiest for the cake portion!

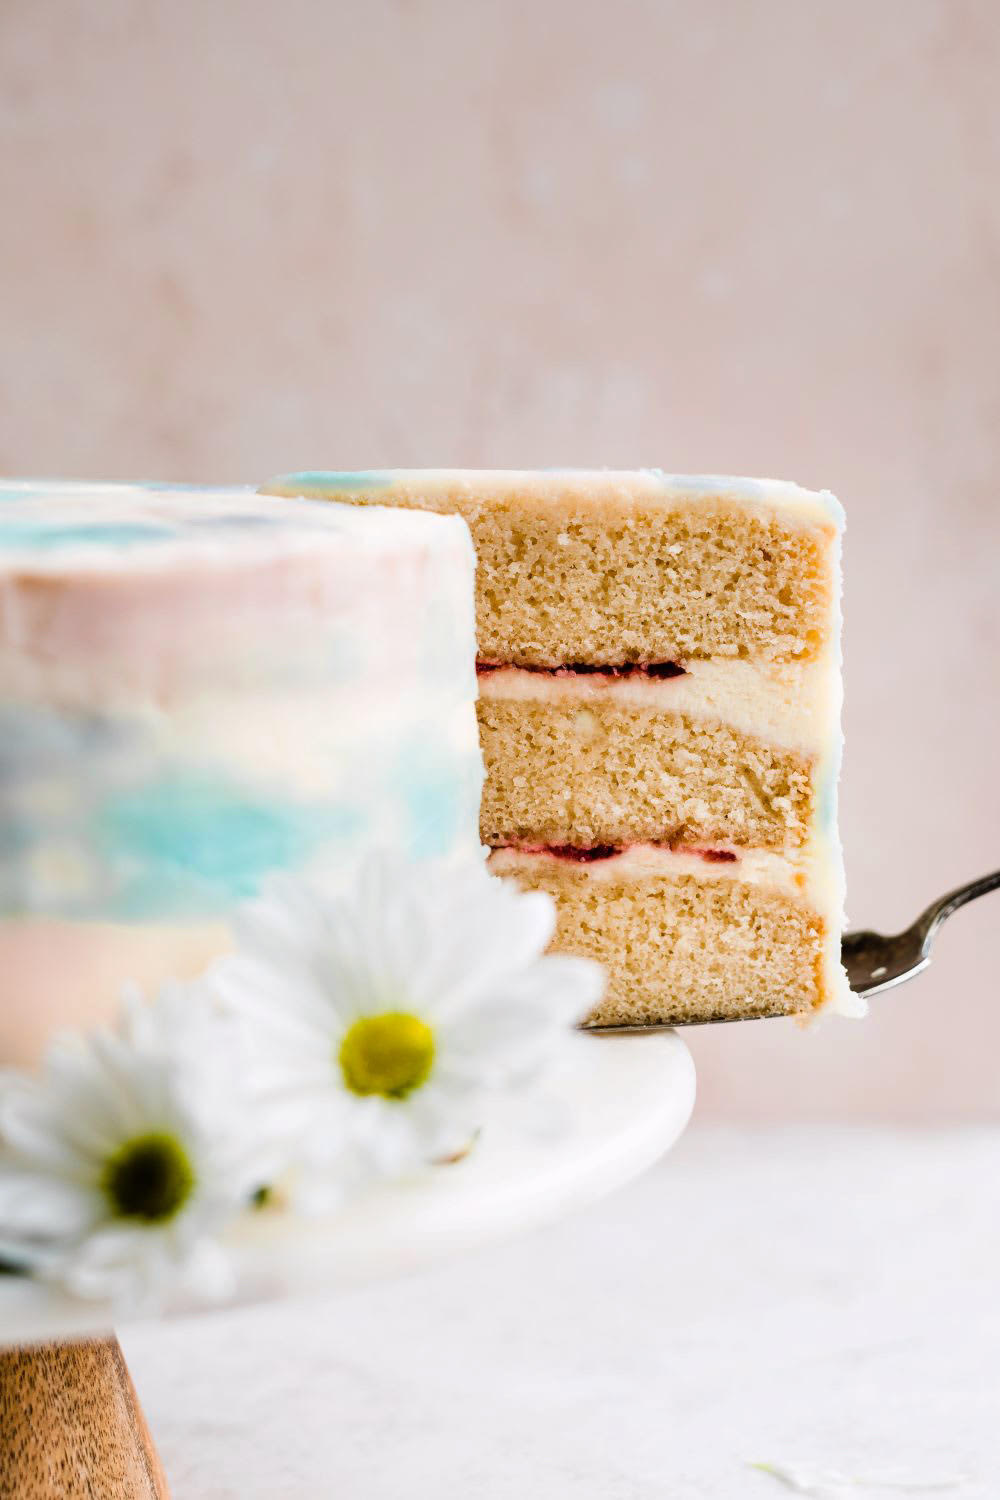
For an extra pop of flavor, I like using some fruit preserves in the center of the cake layers. It’s a fun and unexpected little burst of flavor and color that you’ll love seeing when you cut into the cake.
The tools (listed below) are essential for the success of this cake. The one thing you can get away without is possibly the offset spatula, but it really does make things easier. Gel food coloring provides much better color than regular food coloring, and you can find it online or at places like craft/hobby stores. You can find a cake smoother or scraper online or at craft/hobby stores too. I hope you enjoy decorating your own watercolor cake, and Happy Mother’s Day–or whatever you’re celebrating this season. Scroll on for the complete instructions!
Did you try this technique? Show us your watercolor cake on Instagram @Lulus using #lovelulus–and shop Dresses and more for every Special Occasion this Summer! If you’re looking to give the perfect present this celebration season, don’t forget to check out our selection of Gift Cards!
This recipe comes from our food contributor, Stephanie Simmons, of Blue Bowl. Her goal with her kitchen-tested recipes is to get you excited about cooking, show you how good food can taste, and prove that you don’t need to spend hours in the kitchen to make a good meal.
- PREP TIME: 45-75 (for frosting) MINS
- SERVES: 12-16
- Watercolor Cake Technique
- Bridal Shower Desserts
- Bridal Shower Cake
- Mother's Day Cake
- Mother's Day Desserts
- Baby Shower Desserts
Ingredients
For the Cake:
Any recipe you like or a box mix that makes a 3-layer white cake.
Frosting:
- 4 sticks butter, softened at room temperature
- 16 ounces cream cheese, softened at room temperature
- 1 Tbsp milk
- 8 cups powdered sugar
- 1 Tbsp vanilla extract
- Pinch of salt
- 1 jar of your favorite fruit preserves (preserves usually have better flavor–I used Strawberry Rhubarb)
Tools:
- Gel food coloring (I used the shades Burgandy to make the pink, Teal and Royal blues to make the blue, and Purple for the purple)
- An offset spatula
- A cake smoother/scraper
- Piping tip and bag
Directions
Make the Frosting:
- Once your cake is baked and completely cooled (frosting will melt right off of a warm cake), make the frosting. Mix softened butter and cream cheese together in a large bowl with an electric mixer until nice and creamed together.
- Add half the powdered sugar and the milk, and mix until combined.
- Repeat with the remaining powdered sugar, the vanilla, and the pinch of salt.
Stack and Frost the Cake:
- Lay down four strips of wax paper on your cake stand, making sure the outer edge is covered all the way around–this will protect it from getting messy while you frost.
- Divide the frosting up between a few bowls; you’ll want two bowls with 400 grams of frosting each, for in between the layers, and everything that’s left will be used to frost the top and outside and to create the colors later.
- Place one cake layer down, adding a large dollop of frosting into the center, and using an offset spatula to begin spreading the frosting around, and a bit over the edges of the cake.
- Use the remaining frosting from that section to fill a piping bag fitted with a large round tip. Pipe a ring around the outer edge of the cake layer.
- Microwave ⅓ cup of the fruit preserves for just a few seconds to help make it more spreadable. Spread this inside the frosting ring on top of the frosted cake layer.
- Repeat with the second cake layer. You may need to chill the cake in between layers to help stabilize it if the frosting is becoming warm from sitting out.
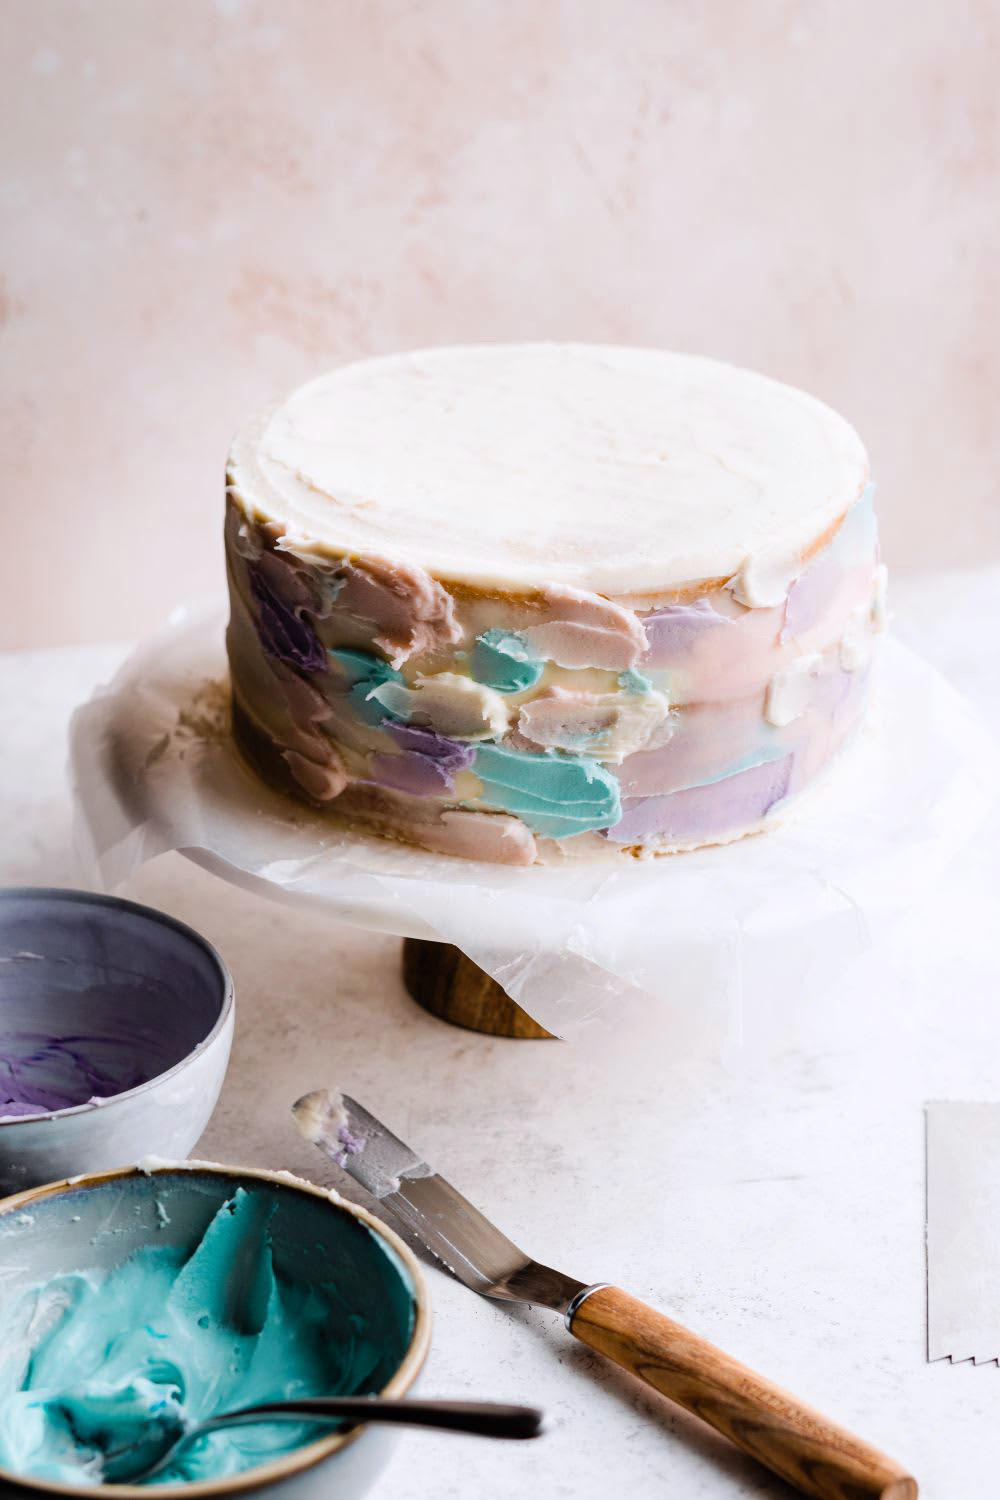
- Frost the top of the cake and add dollops of frosting around the sides. Use the cake scraper to smooth the top and sides. This is your crumb coat.
- Chill this in the fridge for at least 1 hour or up to overnight, before moving on. (I let it chill for a bit so it’s semi-solidified, and then I cover it in plastic wrap. You can stick toothpicks in the cake so the plastic wrap won’t stick to the frosting, too.)
- Store your leftover frosting, covered, in the fridge until ready to use. Let it sit out about 10-20 minutes before using so it becomes spreadable again.
Add the Colored Frosting:
- Add a few large spoonfuls of frosting each to 3-4 small bowls. I recommend leaving plenty of white behind so you have extra wiggle room if you don’t get your colors right the first time around. Play with the gel food colorings until you have your desired colors.
- I just use a toothpick to dot the color into the frosting–it’s SO pigmented that you should just start with a dot at a time, then stir it in and adjust as needed. This food coloring can also stain your clothes so be careful while using it.
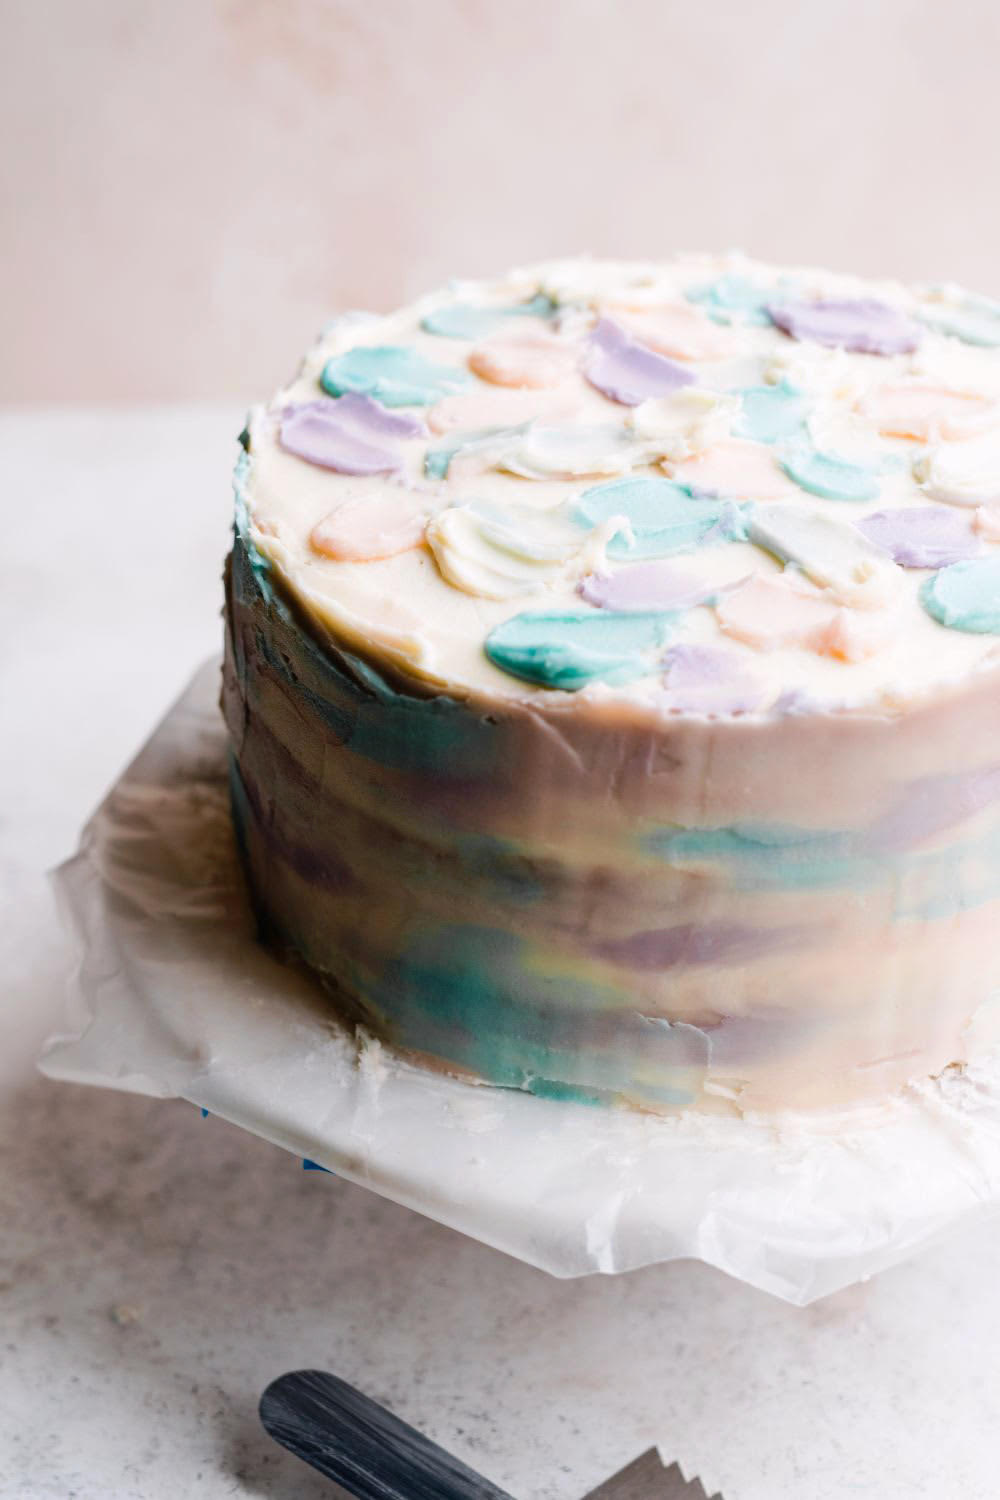
- Once you have the desired colors (I used pink, blue, purple, and a little white to fill in any gaps), add small dollops of the different colors of frosting all the way around the sides of the crumb-coated cake.
- Use a cake smoother to smooth the frosting by holding it against the side of the cake, and slowly turning the cake and pulling the cake smoother towards you while turning the cake the opposite direction. You can go back and fill in any gaps that don’t have enough color as you like. Do the same thing with the top of the cake.
- Let chill for at least 20-30 more minutes before cutting and serving (or more, if you had it out for quite a while).
- Enjoy! Keep leftover cake in an airtight container in the fridge for a few days.
Join The Conversation (0)