It’s officially that time of the year! Spooky season is upon us, and if you’re also obsessed with Halloween, then you know that festive nail art is the perfect way to get into the spirit. But I’m not talking about the same old clichéd designs. Nope, this blood drip mani is chic and oh-so-sinister–and easy to DIY!
You can opt for whatever combo you like, but to strike that just-right balance between stylish and eerie, I’ve done this blood nail art with in deep red with a matte top coat. Whether you’re doling out candy to the neighborhood kids or heading to a costume party, these nails will complete your Halloween ensemble. So, grab your gel polish, UV lamp, and see how to create this look ahead.
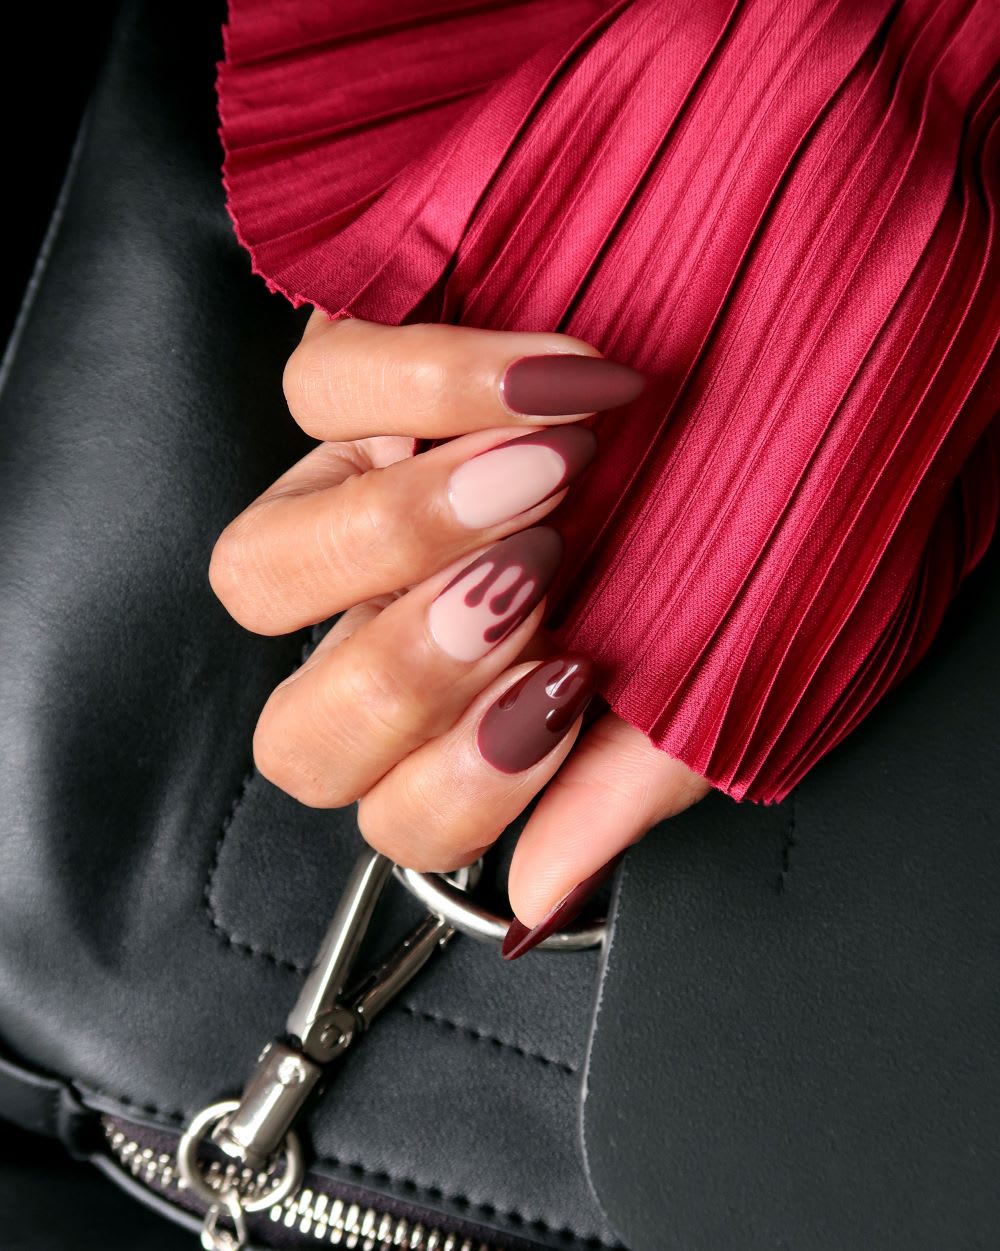
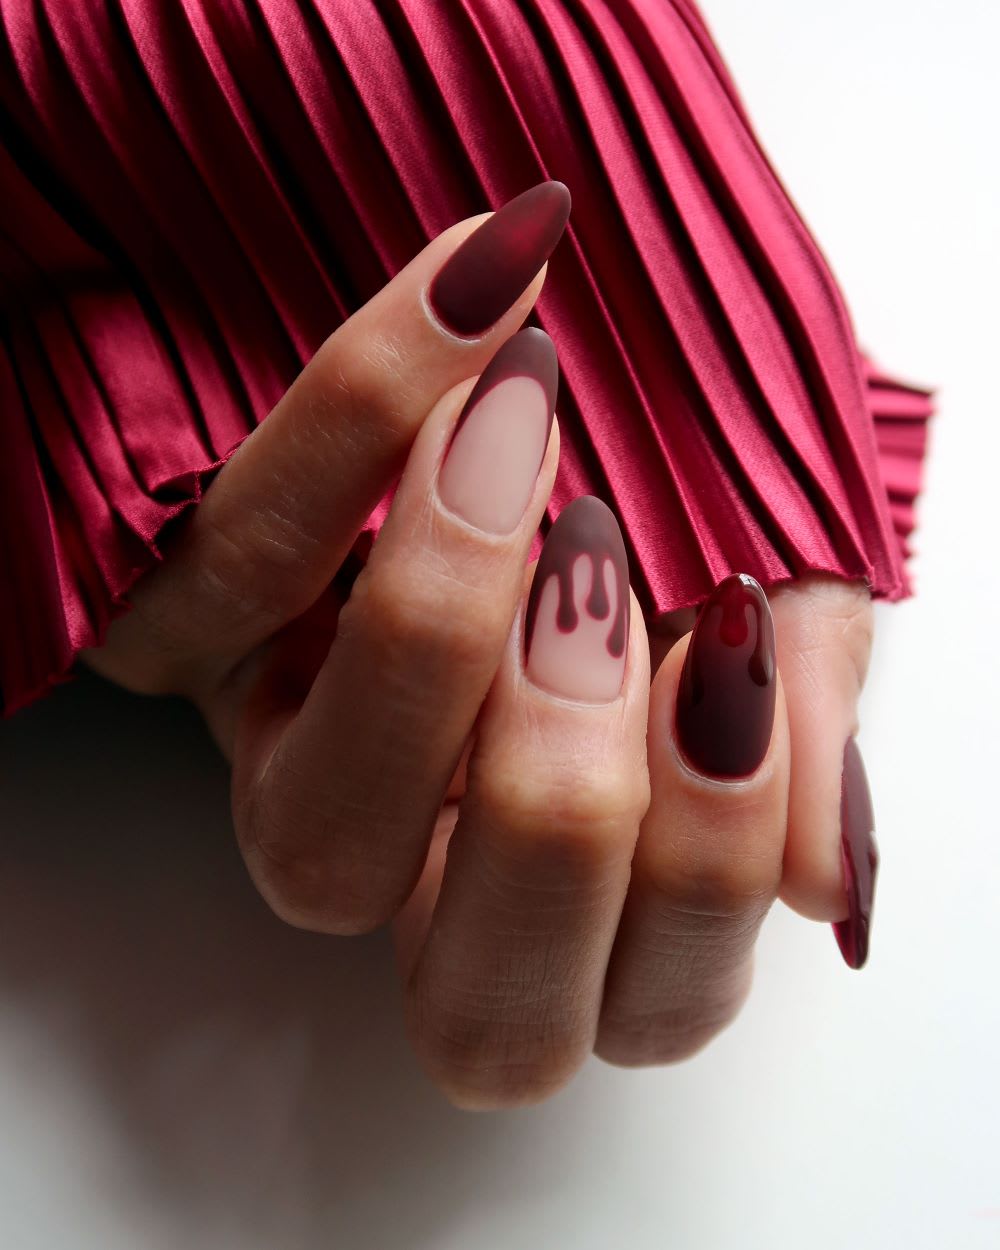
Blood Nail Art
Shop the Look: Staying Optimistic Berry Pink Pleated Bell Sleeve Top, Shy Girl Black Vegan Leather High-Rise Cropped Flare Pants, Sidewalk Stunner Black Vegan Leather Backpack, Hopeful Moments Gold Moon Layered Necklace
Supplies:
- Deep Red Gel Polish: You’re going to need this to achieve the blood-red base.
- Sheer Neutral Gel Base Shade: This will be the canvas for your masterpiece.
- UV Lamp: To make sure your gel polish cures perfectly.
- Dotting Tool: Don’t have one? A bobby pin or pen top can do the trick!
- Thin Nail Art Brush: For those precise details.
- Matte Gel Top Coat: To add that elegant touch.
- Glossy Gel Top Coat: For a hit of glossy finish that’s to die for.
- Cuticle Oil: Because your nails deserve a little love too.
Instructions:
- First things first, prep those nails for a killer look! Clean up any dry skin around your nail beds, gently push back the cuticles, and make sure your nail plate is free of any residue and oils.
- Grab your deep red gel polish and apply 2-3 coats (or as needed) on your thumb, pointer, and pinky fingers. You want them to be as bold and blood-red as possible.
- For the ring and middle fingers, apply 2 coats of the sheer neutral base shade and then cure your entire hand under the UV lamp.
- Now comes the fun part! On the ring and middle fingers, take your deep red shade and the thin nail art brush to create two French tips. Once you’ve nailed it, cure them.
- Time to add some blood drips. Using the dotting tool, create three dots of varying heights just below the French tip on your middle finger using the red shade.
- With the thin liner brush, connect those dots to the French tip with the same red shade, letting it flare out slightly when you reach the dots. This will give you those perfect blood-drip effects. Cure your creation.
- To give your entire mani a sophisticated twist, apply a matte gel top coat to every nail and, you guessed it, cure it.
- We’re not done yet! The thumbnail needs some special attention. Take the glossy gel top coat and use the dotting tool to place three dots of varying heights.
- Using the thin liner brush and more of the glossy gel top coat, connect those dots to the top of the nail. Cure it for a full 60 seconds.
- And finally, let’s not forget the finishing touch–apply some cuticle oil to keep your cuticles in check. Your deadly chic Halloween mani is ready to rock!
So there you have it, a Halloween nail art look that’s both spooky and chic. Now, go out there and flaunt those blood-dripped beauties. Trick or treat!
Did you try these Halloween nails? Show us your blood drip nail art on Instagram or TikTok @lulus–and head to our Fall Fashion Shop for killer styles to wear all season!
Melanie Graves is a self-taught nail art enthusiast who creates colorful, easy DIY designs for fellow home manicurists.
This blog was originally published in 2013 and has been updated with new content.
Join The Conversation (64)
Wow, that glow in the dark effect is awesome! Perfect for Halloween!
Bloody awesome!
Looks wicked fantastic and easy to do!
Love the Glow in the dark effect!
I used to use glow in the dark polish all the time when I was a kid! This gives me the perfect reason to bring it out again for Halloween!
love the glow in the dark idea & looks so easy
OMG! I can’t wait to try this!
love this look so much, hope i can do it this perfectly *fingers crossed*
Thats pretty cool
I love this look for Halloween!
Interesting design! This would be great for Halloween!
I love this look! I have to try it!
Perfect for my sexy vampires look for Halloween!
Love anything that glows. Fancy little party trick 🙂
Thanks for a simple and easy halloween nail art idea! Can’t wait to try it! I would be walking around with a black light to show everyone! 🙂
I’m totally doing this for halloween!!
I’m a nail addict! I don’t remember the last time my nails have seen the light of day
perfect combination of creepy and chic!
I loved this even before I saw the glow in the dark. Brilliant!
I’m definitely going to have to try this! So perfect for halloween!
I didn’t think of using glow in the dark polish. Thanks for the tip!
So cool n chic <3
This is really cool. But I think some time you guys should do a tutorial on healthy nails or something. My nails were so strong before I started painting them regularly. I use Butter London which I thought was a good brand, maybe not.
I love this!!
I really like the glow in the dark effect! That is so much fun!
This is creepy but also really cool 😀
glow in the dark effect is pretty cool!
This is so cool!
Perfect for halloween, love it!!!
Glow in the dark nails?! Don’t mind if I do 🙂
LOVE the bloody nails! perfect for a vampire costume
Love!!
I needed nailspiration for a Halloween party. Thankss!
Red Hot…this is a must try for Halloween or Valentine’s!
Really neat idea!! I’m sure it would get a lot of compliments at a Halloween party, I might have to try this 🙂
I love the blood and the fact that it’s glow in the dark <3
Super awesome! Gotta try these nails out for halloween!
That’s crazy! I love the vibrance of the colors.
Sexy and spooky at the same time? I think yes! I was hoping to do something besides spider webs!
Cool, I hope there are more Halloween tutorials.
Awesome nails! Totally going to get an oxblood nail polish now!! Pumped for Halloween!!
This is absolutely amazing especially the glow in the dark!! Will definitely try it!
This looks amazing!!! I need to try this.
I love it!
that’s so cute.. seems pretty easy too.
The glow in the dark is on point! Great look. It would probably look awesome with longer nails.
Love the glow in the dark! I have a glow in the dark, clear nail polish that I can paint over any color, so I’m gonna have to try this for Halloween!!
This looks so easy to do and makes a huge statement
I love using a dotting tool! This is a great idea, especially the glow-in-the-dark version!
Is it weird that my first thought was “cute”? Haha 🙂
i like it
I’d *really* like to try this. Can you please post what polish you used for the glow in the dark white?? Every one I’ve found is tinted green. 🙁